准备工作
宝塔安装
根据系统自己来吧,建议使用centos。
网站搭建
建议安装LNMP (第一个,NGINX替代了LAMP的Apache。)
NGINX的代理功能是关键。php注意是7.0及以上的版本,mysql建议保持默认的5.7别动。
安装v2ray
在以下的网站中安装v2ray服务端。
https://github.com/v2fly/fhs-install-v2ray#fhs-install-v2ray
fhs-install-v2ray
欲查阅以简体中文撰写的介绍,请访问:README.zh-Hans-CN.md
Bash script for installing V2Ray in operating systems such as Debian / CentOS / Fedora / openSUSE that support systemd
該腳本安裝的文件符合 Filesystem Hierarchy Standard(FHS):
https://wiki.linuxfoundation.org/lsb/fhs
installed: /usr/local/bin/v2ray
installed: /usr/local/bin/v2ctl
installed: /usr/local/share/v2ray/geoip.dat
installed: /usr/local/share/v2ray/geosite.dat
installed: /usr/local/etc/v2ray/config.json
installed: /var/log/v2ray/
installed: /var/log/v2ray/access.log
installed: /var/log/v2ray/error.log
installed: /etc/systemd/system/v2ray.service
installed: /etc/systemd/system/[email protected]
依賴軟體
安裝 cURL
# apt update
# apt install curl
or
# yum makecache
# yum install curl
or
# dnf makecache
# dnf install curl
or
# zypper refresh
# zypper install curl
下載
// 安装本体和数据文件
# curl -O https://raw.githubusercontent.com/v2fly/fhs-install-v2ray/master/install-release.sh
// 只更新数据文件
# curl -O https://raw.githubusercontent.com/v2fly/fhs-install-v2ray/master/install-dat-release.sh
使用
- 該腳本在執行時會提供
info和error等信息,請仔細閱讀。
安裝和更新 V2Ray
# bash install-release.sh安裝最新發行的 geoip.dat 和 geosite.dat
# bash install-dat-release.sh移除 V2Ray
# bash install-release.sh --remove解決問題
- 「不安裝或更新 geoip.dat 和 geosite.dat」。
- 「使用證書時權限不足」。
- 「從舊腳本遷移至此」。
- 「將 .dat 文檔由 lib 目錄移動到 share 目錄」。
- 「使用 VLESS 協議」。
參數
usage: install-release.sh [--remove | --version number | -c | -f | -h | -l | -p]
  [-p address] [--version number | -c | -f]
  --remove        Remove V2Ray
  --version       Install the specified version of V2Ray, e.g., --version v4.18.0
  -c, --check     Check if V2Ray can be updated
  -f, --force     Force installation of the latest version of V2Ray
  -h, --help      Show help
  -l, --local     Install V2Ray from a local file
  -p, --proxy     Download through a proxy server, e.g., -p http://127.0.0.1:8118 or -p socks5://127.0.0.1:1080
維護
請於 develop 分支進行,以避免對主分支造成破壞。
待確定無誤後,兩分支將進行合併。
安装完v2ray之后修改配置文件
v2ray的配置文件一般在如下位置
/usr/local/etc/v2ray/config.json
config.json样例:
{
  "inbounds": [{
    "port": 65432,           //此处为安装时生成的端口,可修改随意,但是保证和下面提到的端口号相同
    "listen":"127.0.0.1",
    "protocol": "vmess",
    "settings": {
      "clients": [
        {
          "id": "c55ad-9c79-4907-905d-259", //此处为安装时生成的id,也可以在网页上自行获取,但是不要自己瞎写
          "level": 1,
          "alterId": 64      //此处为安装时生成的alterId,可以自行设置。
        }
      ]
    },
    "streamSettings": {
      "network": "ws",
      "wsSettings": {
        "path": "/daili/"   //此处为路径,需要和下面NGINX上面的路径配置一样
      }
    }
  }],
  "outbounds": [{
    "protocol": "freedom",
    "settings": {}
  },{
    "protocol": "blackhole",
    "settings": {},
    "tag": "blocked"
  }],
  "routing": {
    "rules": [
      {
        "type": "field",
        "ip": ["geoip:private"],
        "outboundTag": "blocked"
      }
    ]
  }
}
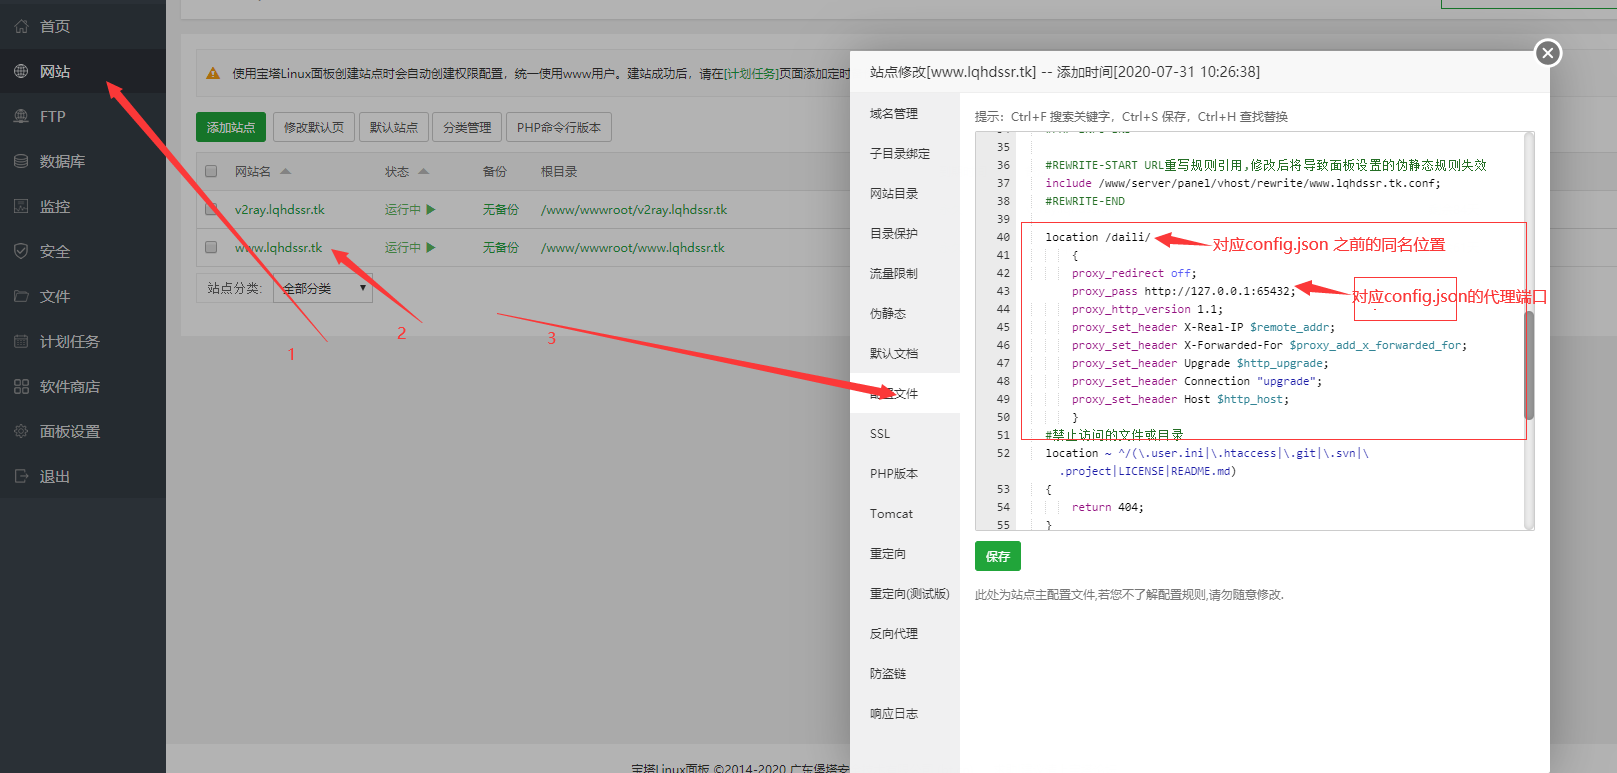
之后,转到宝塔管理界面,网站——你想要伪装的域名(比如博客名)——进入站点修改
#下方是v2ray代理
location /daili/
    {
    proxy_redirect off;
      proxy_pass http://127.0.0.1:65432;
    proxy_http_version 1.1;
    proxy_set_header X-Real-IP $remote_addr;
    proxy_set_header X-Forwarded-For $proxy_add_x_forwarded_for;
    proxy_set_header Upgrade $http_upgrade;
    proxy_set_header Connection "upgrade";
    proxy_set_header Host $http_host;
    }

修改之后,根据v2ray官方文档自行添加客户端配置即可。

13 条评论
华纳圣淘沙公司快速开户通道(183-8890-9465—?薇-STS5099【6011643】
三分钟搞定华纳圣淘沙公司开户
(183-8890-9465—?薇-STS5099【6011643】
华纳圣淘沙公司极速开户攻略(183-8890-9465—?薇-STS5099【6011643】
华纳圣淘沙开户流程提速秘籍(183-8890-9465—?薇-STS5099【6011643】
如何快速完成华纳圣淘沙公司注册(183-8890-9465—?薇-STS5099【6011643】
新盛客服电话是多少?(?183-8890-9465—《?薇-STS5099】【
新盛开户专线联系方式?(?183-8890--9465—《?薇-STS5099】【?扣6011643??】
新盛客服开户电话全攻略,让娱乐更顺畅!(?183-8890--9465—《?薇-STS5099】客服开户流程,华纳新盛客服开户流程图(?183-8890--9465—《?薇-STS5099】
华纳万宝路客服电话是多少?(?183-8890-9465—《?薇-STS5099】【?扣6011643??】
华纳万宝路开户专线联系方式?(?183-8890--9465—《?薇-STS5099】【?扣6011643??】
华纳圣淘沙客服开户电话全攻略,让娱乐更顺畅!(?183-8890--9465—《?薇-STS5099】客服开户流程,华纳圣淘沙客服开户流程图(?183-8890--9465—《?薇-STS5099】
华纳东方明珠开户专线联系方式?(?183-8890--9465—《?薇-STS5099】【?扣6011643??】
华纳东方明珠客服电话是多少?(▲18288362750?《?微信STS5099? 】
如何联系华纳东方明珠客服?(▲18288362750?《?微信STS5099? 】
华纳东方明珠官方客服联系方式?(▲18288362750?《?微信STS5099?
华纳东方明珠客服热线?(▲18288362750?《?微信STS5099?
华纳东方明珠24小时客服电话?(▲18288362750?《?微信STS5099? 】
华纳东方明珠官方客服在线咨询?(▲18288362750?《?微信STS5099?
华纳东方明珠客服电话是多少?(▲18288362750?《?微信STS5099? 】【╃q 2704132802╃】
华纳东方明珠开户专线联系方式?(▲18288362750?《?微信STS5099? 】【╃q 2704132802╃】
如何联系华纳东方明珠客服?(▲18288362750?《?微信STS5099? 】【╃q 2704132802╃】
华纳东方明珠官方客服联系方式?(▲18288362750?《?微信STS5099? 】【╃q 2704132802╃】
华纳东方明珠客服热线?(▲18288362750?《?微信STS5099? 】【╃q 2704132802╃】
华纳东方明珠开户客服电话?(▲182(▲18288362750?《?微信STS5099? 】【╃q 2704132802╃】
华纳东方明珠24小时客服电话?(▲18288362750?《?微信STS5099? 】【╃q 2704132802╃】
华纳东方明珠客服邮箱?(▲18288362750?《?微信STS5099? 】【╃q 2704132802╃】
华纳东方明珠官方客服在线咨询?(▲18288362750?《?微信STS5099? 】【╃q 2704132802╃】
华纳东方明珠客服微信?(▲18288362750?《?微信STS5099? 】【╃q 2704132802╃】
微信电话同步?【——183-88909465—微电同号】?华纳公司客服联系方式?【6011643——183-88909465——-】、?华纳公司直属开户
华纳公司注册会员流程?(▲18288362750?《?微信STS5099? 】【╃q 2704132802╃】
如何成为华纳公司会员?(▲18288362750?《?微信STS5099? 】【╃q 2704132802╃】
华纳直属会员开户步骤?(▲18288362750?《?微信STS5099? 】【╃q 2704132802╃】
华纳公司会员注册指南?(▲18288362750?《?微信STS5099? 】【╃q 2704132802╃】
华纳总公司会员申请?(▲18288362750?《?微信STS5099? 】【╃q 2704132802╃】
华纳公司会员注册所需材料?(▲18288362750?《?微信STS5099? 】【╃q 2704132802╃】
华纳会员开户流程?(▲18288362750?《?微信STS5099? 】【╃q 2704132802╃】
华纳公司注册会员步骤?(▲18288362750?《?微信STS5099? 】【╃q 2704132802╃】
华纳会员申请流程?(▲18288362750?《?微信STS5099? 】【╃q 2704132802╃】(▲18288362750?《?微信STS5099? 】【╃q 2704132802╃】
华纳公司会员注册指南?(▲18288362750?《?微信STS5099? 】【╃q 2704132802╃】
新车新盘 嘎嘎稳 嘎嘎靠谱coinsrore.com
新车新盘 嘎嘎稳 嘎嘎靠谱coinsrore.com
新盘新项目,不再等待,现在就是最佳上车机会!
作者的才华横溢,让这篇文章成为了一篇不可多得的艺术品。
操作步骤清晰,指导性强,易于实践。
?文化类评语?